How to Do a Velocity Edit in Alight Motion (v5.0.282 Tutorial)
Updated on January 26, 2026
You scroll through TikTok and see an edit where the character moves in slow motion, then suddenly speeds up instantly to hit the bass drop, and then goes back to slow motion. It looks fluid, aggressive, and professional.
This is called a Velocity Edit (or Speed Ramping).
It is the single most popular editing style in 2025. While PC editors use After Effects to achieve this, Alight Motion is the only mobile app powerful enough to replicate it perfectly using Time Remapping.
In this tutorial, we will walk you through the exact process of creating a viral-worthy Velocity Edit Alight Motion style—from marking your beats to mastering the dreaded Speed Graph.
What is a “Velocity Edit”? (The Speed Ramp Explained)
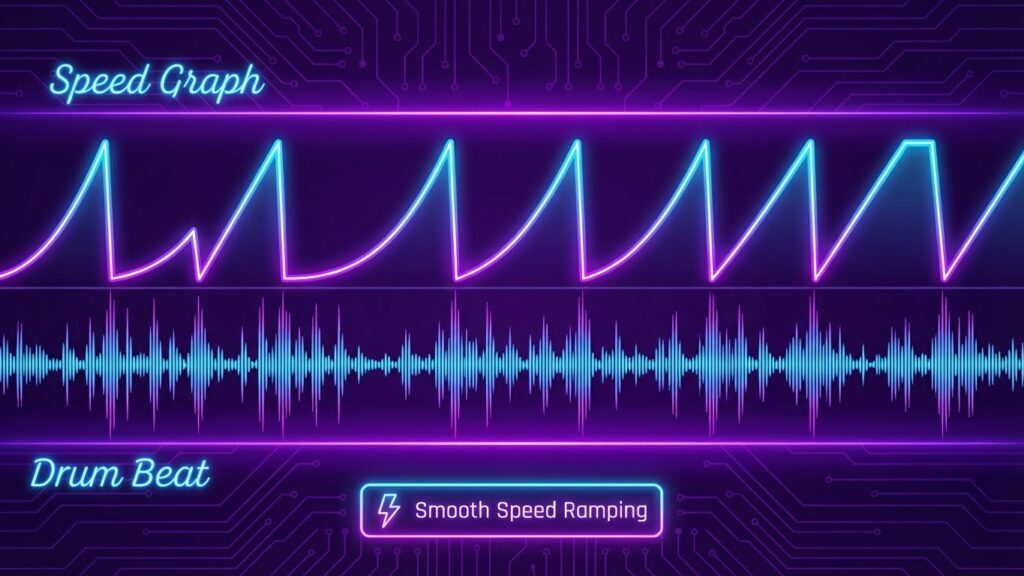
Velocity isn’t just “Speeding up” a video. It is the variation of speed.
The “Slow-Fast-Slow” Rhythm
A standard video plays at 100% speed (1.0x). A Velocity Edit manipulates time dynamically:
- The Build-Up: The clip plays in Slow Motion (0.2x – 0.5x).
- The Beat Drop: The clip spikes to Fast Motion (5.0x) exactly when the drum hits.
- The Recovery: It immediately smooths back down to Slow Motion.
This contrast creates “impact.”
Step 1: Preparing Your Audio & Beats
You cannot do a velocity edit without music. The edit follows the music.
Importing Sound
- Create a new project (9:16 aspect ratio is best for Velocity).
- Tap (+) > Audio and import your song.
- Tip: Choose a song with distinct, heavy bass hits (Phonk or Trap music works best).
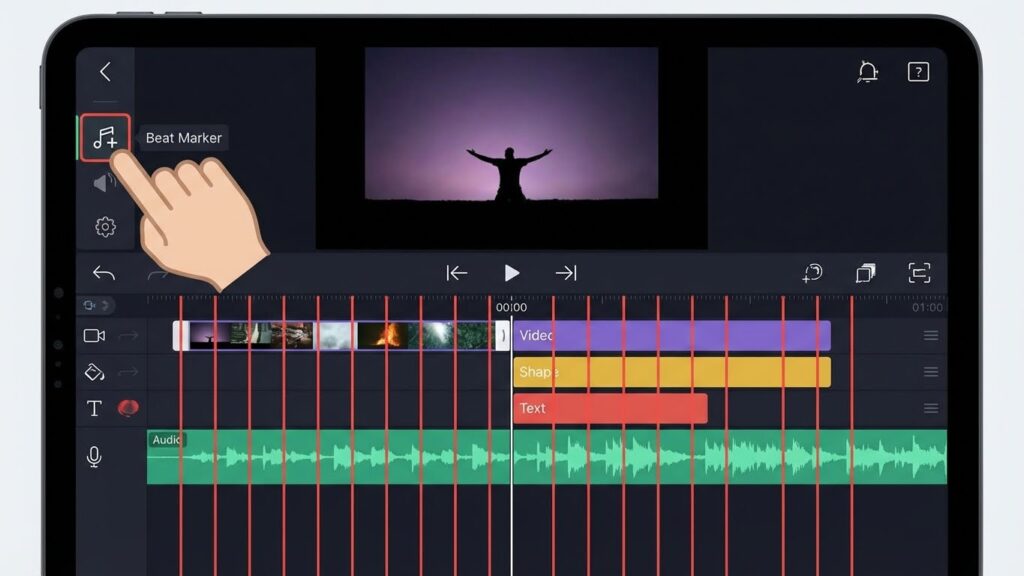
Marking the Beats (The Most Critical Step)
If you miss this, your edit will fail.
- Listen to the song in the timeline.
- Scroll to the exact millisecond where the “Bass” or “Kick Drum” hits.
- Tap the Time Marker (the timestamp numbers on the left). It will turn Red.
- Repeat this for every beat you want to sync to.
- Shortcut: If you don’t want to do this manually, download one of our pre-synced [Beat Mark Presets].
Step 2: The Cutting Technique (Splitting Clips)
Now, bring in your video footage.
Why You Must Cut on the Beat
- Import your video clip.
- Scroll to your first Red Beat Mark.
- Tap the Video Layer > Split in Middle (the icon with the line in the center).
- Delete the excess or align the next clip to start exactly at this cut.
- Goal: You want a separate video segment for every beat interval.
Step 3: Mastering the Speed Graph (Time Remapping)
This is where the magic happens. We are going to warp time using graphs.
How to Access the Speed Panel
- Select your split video clip.
- Tap Speed.
- Do NOT use the slider. The slider is for constant speed.
- Tap the Graph Icon (under the slider).
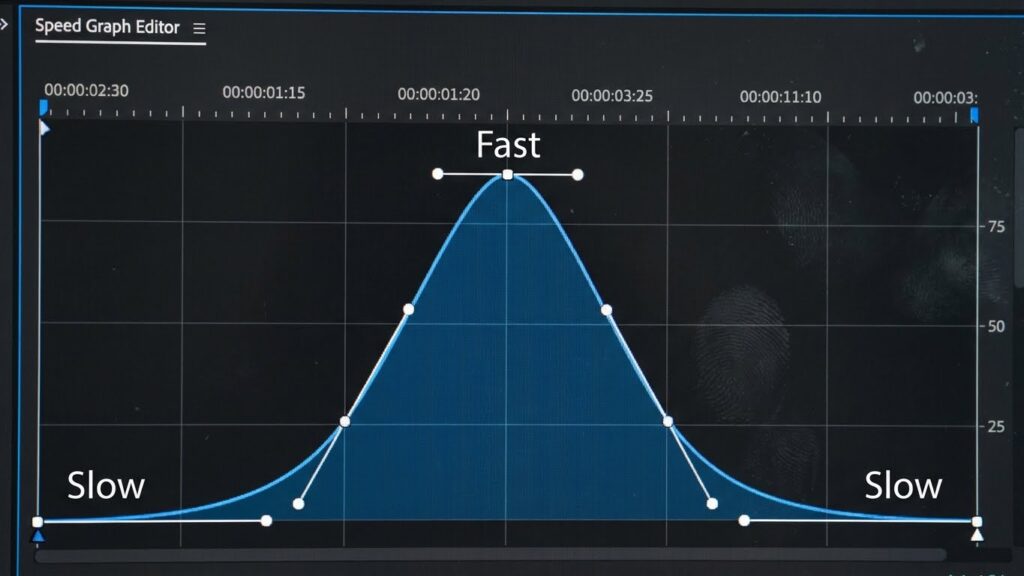
The Perfect “V-Shape” Graph
To get that “Snap” effect:
- Start Point (Left): Pull the dot Down (Slow Motion).
- End Point (Right): Pull the dot Down (Slow Motion).
- Middle Point: Add a keyframe in the middle of the graph and pull it Way Up (Fast Motion).
- Result: The graph looks like an inverted “V” or a mountain peak. The video starts slow, accelerates violently in the middle, and ends slow.
Alternative Style: The “Flash” Velocity.
- Pull the start Up (Fast) and the end Down (Slow). This creates a “Hit and Fade” motion.
Step 4: Making It Smooth (Optical Flow vs. Frame Blending)
When you slow a 30fps video down to 0.2x speed, it looks choppy because there aren’t enough frames. Alight Motion fixes this with AI.
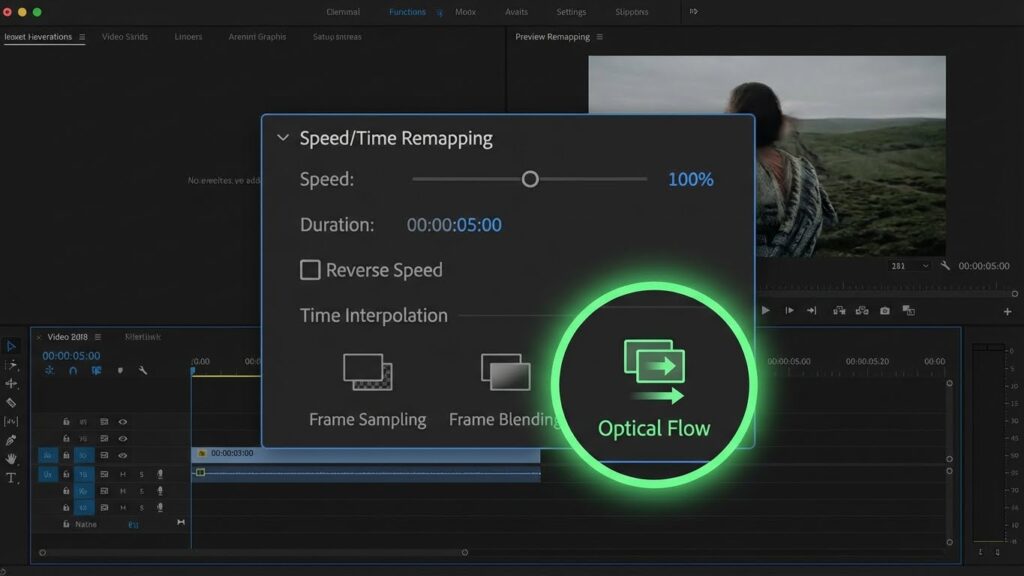
Fixing Choppy Slow Motion
Inside the Speed panel:
- Look for the “Sampling” options (usually 3 dots or an icon).
- Select Optical Flow.
- What it does: The app invents new “fake” frames between the real frames to make the slow motion look buttery smooth, like it was shot on a high-speed camera.
- Warning: This uses a lot of CPU. If your phone lags, check our [Troubleshooting Hub] for performance fixes.
Step 5: Adding the “Flash” Impact
Speed isn’t enough. You need visual impact. Every time the speed spikes, the screen should flash.
Using Exposure/Gamma for Beat Drops
- Go to Effects > Add Effect > Color & Light > Exposure/Gamma.
- Add a Keyframe at the Start of the clip. Set Exposure to 2.0 (Bright White).
- Add a Keyframe at 0.2 seconds. Set Exposure to 0.0 (Normal).
- Open the Graph Editor for Exposure and use an “Ease Out” curve.
- Result: A bright white flash hits on the beat and fades out instantly.
Common Velocity Mistakes
Off-Sync Audio
If your video lags behind the beat:
- Fix: You likely added “Motion Blur” too early. Disable all effects while editing to ensure the preview playback speed is accurate. Only enable them before export.
“Warped” Audio Pitch
If you accidentally included audio in your video clip, changing the speed will make the voices sound like chipmunks or demons.
- Fix: Tap the Video Layer > Volume > Turn it to 0%. Only use the main music track for audio.
Frequently Asked Questions (FAQ)
Conclusion: Find Your Flow
A great Velocity Edit is all about rhythm. It shouldn’t feel chaotic; it should feel like the video is “dancing” to the music.
Master the Speed Graph, use Optical Flow to smooth out the slow parts, and don’t forget to add that Exposure Flash for impact. Once you are comfortable with this, you can combine it with our [Shake Effect Presets] for even more energy.
Now, go import a song and start marking those beats!