Alight Motion Keyframes & Graphs: The Ultimate Beginner’s Guide (2025)
Updated on January 26, 2026
Open Alight Motion. Add a shape. Look at the bottom left of your screen. Do you see that little Diamond Icon with a “plus” sign?
That tiny button is the most powerful tool in mobile video editing.
It is the Keyframe button. It is the difference between a static photo and a moving masterpiece. Whether you want to make text fly in, create a smooth camera zoom, or build complex character animations, it all starts with the Keyframe.
In this guide, part of our [Alight Motion Editing Academy], we are going to strip away the complex math and teach you exactly how to animate like a pro. By the end of this article, you will understand not just how to move things, but how to make them move smoothly using the Graph Editor.
What is a Alight Motion Keyframes?
In simple terms, a Keyframe is a marker in time. It tells the app: “At this specific second, I want this layer to look exactly like this.”

The “Point A to Point B” Logic
Imagine you want to slide a text box from the Left side of the screen to the Right side.
- Keyframe 1 (0:00): You tell the app, “Start on the Left.”
- Keyframe 2 (0:02): You tell the app, “End on the Right.”
Alight Motion does the heavy lifting. It automatically calculates the movement for every frame between 0:00 and 0:02. This process is called Interpolation. You only define the start and the end; the app fills in the middle.
Tutorial: Your First Animation in 3 Steps
Let’s stop reading and start doing. Open Alight Motion and follow these steps to animate a simple Circle shape.
Step 1: Setting the Start Point
- Tap the (+) button and add a Circle shape.
- Tap on the Circle layer in the timeline.
- Tap “Move & Transform” (the icon with arrows).
- Move your Playhead (the white line) to the start of the clip.
- Tap the Keyframe Diamond (+). A small white diamond will appear on the timeline.
- Drag the circle to the Left side of the screen.
Step 2: Setting the End Point
- Move your Playhead forward to 2 seconds.
- Drag the circle to the Right side of the screen.
- Note: You do not need to tap the Diamond button again. As soon as you move the object, Alight Motion automatically adds a new Keyframe because you changed its position.
Step 3: Watching the “In-Between” Magic
Press Play. You will see the circle slide perfectly across the screen. Congratulations, you just created your first animation!
Pro Tip: This works for everything. You can Keyframe Opacity (fade in/out), Rotation (spin), Scale (zoom), and even Effects (blur intensity).
The Graph Editor: Why Your Edits Look Robotic
If you followed the steps above, your circle moved, but it looked… boring. It moved at a constant, robotic speed. In the editing world, we call this Linear Motion.
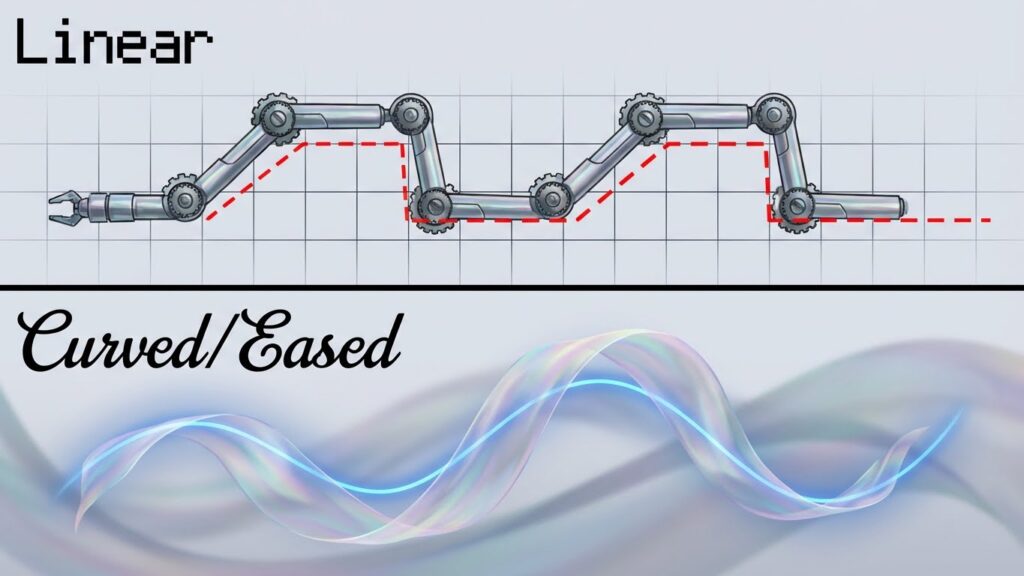
Real life isn’t Linear. When a car starts, it accelerates. When it stops, it decelerates. To make your animation look professional, you need to change the Speed, not just the Position.
This is where the Graph Editor comes in.
Linear vs. Curved Motion (The Physics of Flow)
- Linear (Bad): Constant speed. Looks unnatural.
- Curved (Good): Variable speed. Starts slow, goes fast, ends slow.
The 4 Graph Presets You Must Know
Inside “Move & Transform,” look for the Graph Icon (it looks like a small curve line) under the timeline.
- Ease In: Starts slow, gets fast. Use this when an object is leaving the screen.
- Ease Out: Starts fast, slows down. Use this when an object is entering the screen.
- Linear: The default straight line. Avoid this unless you are doing a continuous spin.
- Elastic/Bounce: The line goes up and down. Used for playful text that bounces when it hits the screen.
Mastering Bezier Curves (The S-Curve)
If you want that “Instagram Edit” or “AMV” look, presets aren’t enough. You need to build custom Bezier Curves.
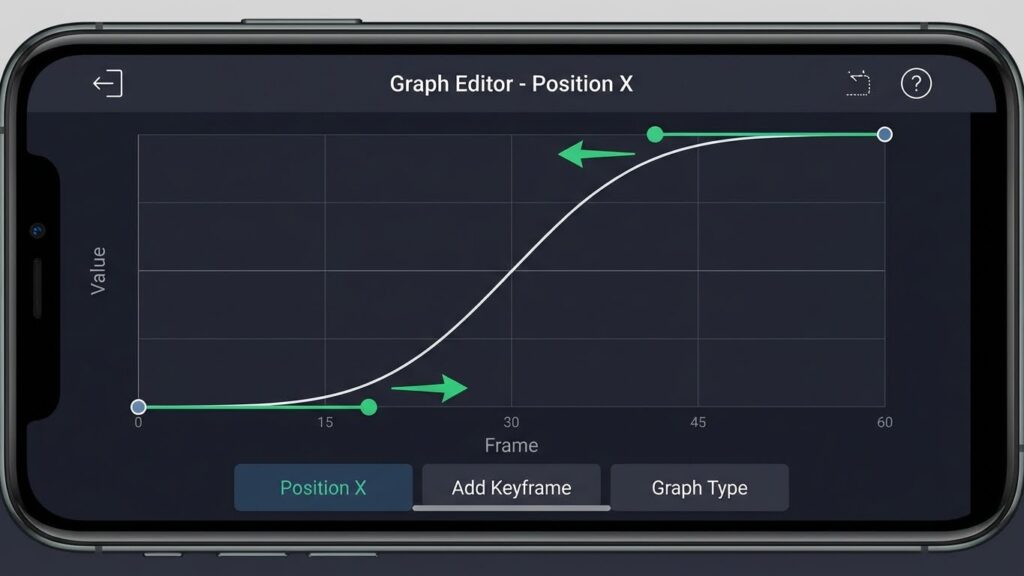
How to Create the “Ease In, Ease Out” Effect
This is the most used graph in history. It creates a smooth flow.
- Place your Playhead between two keyframes.
- Open the Graph Editor.
- Pull the Left Handle down and to the right.
- Pull the Right Handle up and to the left.
- The line should look like the letter “S”.
- Result: The animation starts slow, whips fast in the middle, and brakes smoothly at the end. This is the secret to [Velocity Edits].
Why Pro Editors Use “Overshoot” Curves
An “Overshoot” makes the object go slightly past its final destination and then pull back. It gives the animation weight and impact.
- How to do it: Pull the Right Handle way up above the grid line.
- Use Case: Great for [Text Animation Presets] where letters pop onto the screen with energy.
Common Keyframe Mistakes
The “Wobble” (Too Many Keyframes)
Beginners often add a keyframe every 0.1 seconds to “control” the movement.
- The Problem: This creates a shaky, jittery animation because the path isn’t smooth.
- The Fix: Use the minimum number of keyframes possible (usually just Start and End) and let the Graph handle the movement in between.
Forgetting to Copy/Paste Curves
If you have 10 layers flying in, adjusting the graph for each one is painful.
- The Workflow: Create a perfect graph on Layer 1. Tap the Three Dots (bottom left of graph) > Copy Curve. Go to Layer 2 > Three Dots > Paste Curve. Now they move perfectly in sync.
Frequently Asked Questions (FAQ)
Conclusion: Practice Makes Perfect
Keyframes are the alphabet of Alight Motion. Once you learn them, you can write any visual story you want.
Your homework: Open the app, create a simple shape, and practice the S-Curve Graph. Once you master that smooth motion, you are ready to move on to our [Velocity Edit Tutorial] to apply these skills to video clips.
If you run into technical issues like lag while animating, check our [Troubleshooting Hub] for optimization tips.